How To Take Down Kitchen Cabinet - Pull-Down Shelf in Kitchen Cabinet | HGTV - Make the necessary cuts in the kitchen cabinets, cutting out the wood to be able to fit.
How To Take Down Kitchen Cabinet - Pull-Down Shelf in Kitchen Cabinet | HGTV - Make the necessary cuts in the kitchen cabinets, cutting out the wood to be able to fit.. For me, that was a door behind the island. Some builders will use nails to attach lower cabinets. Most hinges are screwed to the face frame of the cabinet. Unscrew the mounting points where the cabinet is secured to the wall. You need a flat pry.
If they are nailed, it should be easy to pull the nails. Be careful not to damage the front of the cabinets. Most cabinets are not nailed into the walls because of the weight they have to bear. Take off the cove molding along the soffit with a pry bar. Place the corner cabinet into position on the wall stud marking.
Handicap Upper Kitchen Cabinets | Accessible kitchen, Kitchen remodel small, Upper kitchen cabinets from i.pinimg.com Cut the silicone adhesive between the cabinet and countertop using a razor knife. Lower the cabinets away from the. The cabinets should be secured to the wall through the back brace every 16 inches with screws. Open each cabinet section's drawers and doors to find the screws fastening it to the wall and to the cabinets next to it—usually one in each corner. Start at one end of the kitchen and pry each cabinet section away from the wall. I had sanded down each cabinet, but i'm not sure if that's necessary on laminate when you're using the zinsser. Lay a drop cloth on the floor over the counter top, whichever is applicable. Then, turn off the water and the power to your kitchen.
Particle board or thinner plywood and the backs might just break up or come apart.
This is not unlike removing cabinets from a residential kitchen and only requires a couple of tools. Most hinges are screwed to the face frame of the cabinet. Drive the paint scraper forward about an inch to break the adhesive seal (image 1). A lot depends on what the back of the cabinets are made of and what the walls of the kitchen are covered with. However, as with kitchen cabinets, you will need a helping hand to be able to dismount the cabinets without damaging other parts of your travel trailer. A cordless drill with a screwdriver bit will make the job go much faster. Remove the trim, disassemble the cabinets, and disconnect them from the walls one at a time. Lay a drop cloth on the floor over the counter top, whichever is applicable. I work at a cabinet shop and it seems once a month someone buys a new refrigerator and its bigger than the old one so they need to replace the old cabinet ab. We figured it'd just call for removing a few screws like the last kitchen, but it turns out these cabinets were nailed in. Cut the silicone adhesive between the cabinet and countertop using a razor knife. Lower the cabinets away from the. Taking the cabinet down was tougher than we anticipated.
Use the hammer to wedge it completely under the cabinet. Make the necessary cuts in the kitchen cabinets, cutting out the wood to be able to fit. In this case, use a pry bar to slowly work down the length of the cabinet to free it from the wall. Start by unscrewing hinges and removing cabinet doors to make the cabinets lighter and easier to carry. A lot depends on what the back of the cabinets are made of and what the walls of the kitchen are covered with.
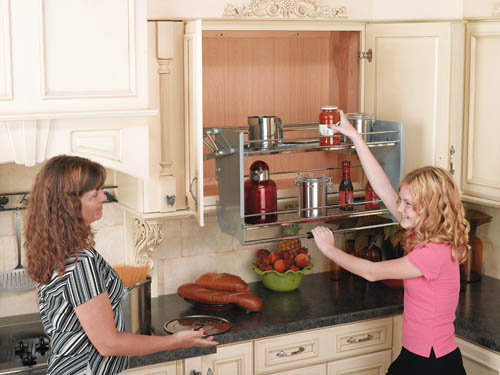
Wall Cabinet Pull-Down Shelving System: Shelves That Slide from www.shelvesthatslide.com At this time they should drop down. If you have removed all of the side screws and top screws from the cabinet, it should come off the wall easily. When you want to remove kitchen cabinets, the easiest thing to start with is the doors and the drawers. Some builders will use nails to attach lower cabinets. Open each cabinet section's drawers and doors to find the screws fastening it to the wall and to the cabinets next to it—usually one in each corner. In this case, only wiring has to be routed out of the way. We have a very long galley style kitchen so there are many, many cabinets. In this case, use a pry bar to slowly work down the length of the cabinet to free it from the wall.
The first thing to do it take your utility knife to cut through the bead of caulk used at the back side of the cabinet against the wall and wherever the cabinet and wall meet.
A cordless drill with a screwdriver bit will make the job go much faster. At this time they should drop down. A lot depends on what the back of the cabinets are made of and what the walls of the kitchen are covered with. If the cabinet is not falling, it's still attached somewhere. We figured it'd just call for removing a few screws like the last kitchen, but it turns out these cabinets were nailed in. Use the hammer to wedge it completely under the cabinet. The first thing to do it take your utility knife to cut through the bead of caulk used at the back side of the cabinet against the wall and wherever the cabinet and wall meet. Remove cabinet doors and set aside. I used two coats of primer because my cabinets were very dark, and i wanted to make sure i wasn't putting six coats of paint on any more of them. You can also use a drill, which is much faster. For me, that was a door behind the island. If you have removed all of the side screws and top screws from the cabinet, it should come off the wall easily. Drive the paint scraper forward about an inch to break the adhesive seal (image 1).
3/4 plywood as the backs and you can pry them off. Put on goggles and a dust mask. We have a very long galley style kitchen so there are many, many cabinets. Be careful not to damage the front of the cabinets. Watch our ikea kitchen installation vi.
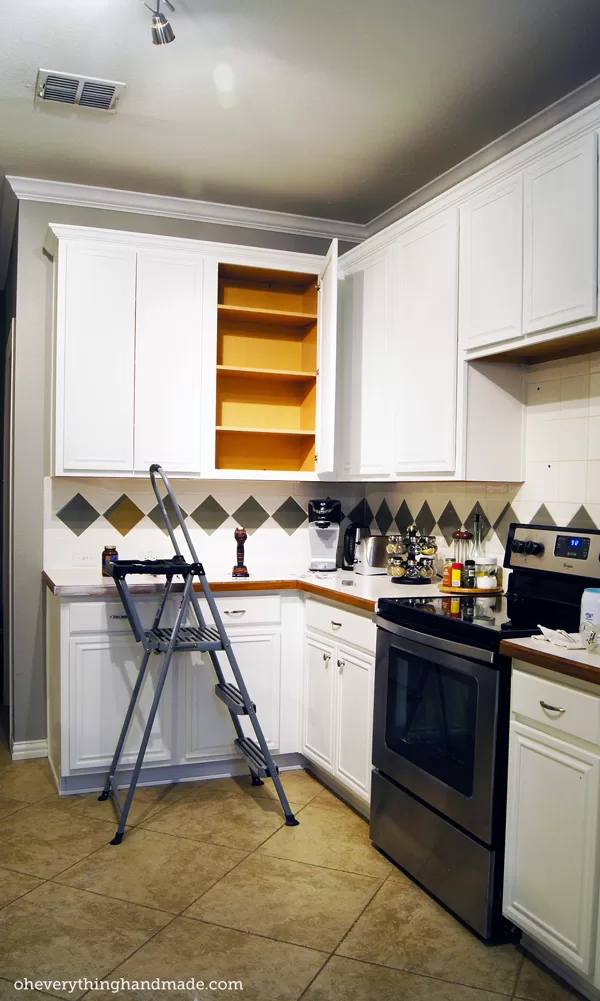
Kitchen Remodel // Removing upper cabinets from www.oheverythinghandmade.com Take off the cove molding along the soffit with a pry bar. If the cabinet is not falling, it's still attached somewhere. Remove them with a screwdriver. Start at one end of the kitchen and pry each cabinet section away from the wall. Before you know it, the old cabinets will be out of your travel trailer. Watch our ikea kitchen installation vi. Place the corner cabinet into position on the wall stud marking. The 2x4 creates a cabinet jack that will hold the cabinet in place once you release it from the wall and are ready to begin removing it from the wall.
Place the corner cabinet into position on the wall stud marking.
Make the necessary cuts in the kitchen cabinets, cutting out the wood to be able to fit. With some patience, you can remove these cabinets easily without hiring a professional. This is not unlike removing cabinets from a residential kitchen and only requires a couple of tools. Take off the cove molding along the soffit with a pry bar. Remove cabinet doors and set aside. For me, that was a door behind the island. Place the corner cabinet into position on the wall stud marking. In this case, use a pry bar to slowly work down the length of the cabinet to free it from the wall. Drive the paint scraper forward about an inch to break the adhesive seal (image 1). The above picture shows the wall cabinets have been taken down and the soffits torn out. If the cabinet is not falling, it's still attached somewhere. Use the hammer to wedge it completely under the cabinet. Put on goggles and a dust mask.